


All About The Shot One - Blue Light

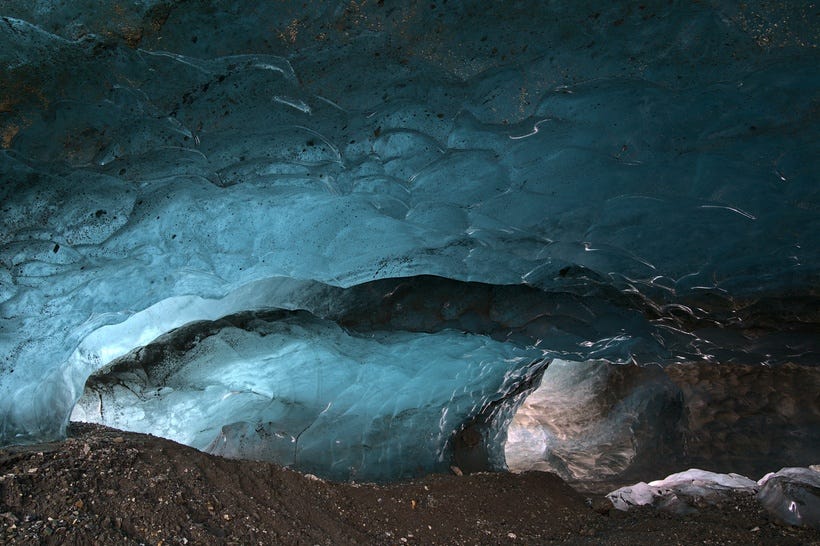
Camera: Sony Alpha a7iii
Lens: Sigma 24-70mm f/2.8 DG DN Art Lens
Focal Length: 24 mm
Aperture: f/6.3
Exposure Time: 0.3 s
ISO: 400
Prints and Wall Art
I'm not sure I like photographing anything more than the blue ice glow inside a glacier cave. Maybe the aurora. Or perhaps wild predatory mammals. Ok, glacier caves are in my top five.
The first time I went out and photographed one of these, the pictures turned out to be trash. I was so amazed by the place I was in that I paid little attention to the photos I took. They were all blurry, underexposed, or poorly framed and composed.
A similar thing happened when I first flew to a glacier in the Alaska Range. I had been up the night before photographing the aurora. I left my camera at a very high ISO setting. Once again, blown away by the scenery, it went unnoticed that all the shots were overblown and full of ISO noise.
I like to think that I've matured as a photographer and am now better at checking my settings and reviewing my shots (I've never liked chimping - checking every photo after I've taken the picture). But I'm human, and I know I can get too excited over something (or not have the time) to pay much attention to what I'm doing.
One thing I find very helpful is shooting more frequently with a tripod. It doesn't just help keep the camera steady or allow for a longer exposure. It makes me think more about the shot. I'm more careful about framing and composition. I'm more apt to check and optimize my settings. After taking the additional time to set up the camera system, I'm more likely to want to review the focus and the histogram; to see if the photograph's elements came together in the way I had envisioned it.
This is often not helpful with fast-moving wildlife or aerial photos over the mountains. But it absolutely helps in glacier caves. Even with the blue glow, it's often dark in there. The tripod lets me reduce exposure time and keep ISO noise low. It's also challenging to see the differences in the amount of light coming through the ice by eye, but it will be noticeable in the final image. The light from the entrances is much brighter and will often be overblown; paying attention to the histogram is necessary.
What to Expect in A Cave Like This
Prepare to get wet in summer (when this photo was taken). Water is constantly raining from the ceiling as the cave melts. These caves are formed initially as narrow tunnels melted out by water. Further down in the ablation area, when air can enter these tubes, they are melted further by air. Once more than one tube section is exposed to the outside air, it can begin melting fast (You can read more about the formation of these caves in my article Ice Crystals in R-Channels). This fast melt leads to much water and rocky inclusions that may rain down from above. Wear a helmet!
It also pays to keep something handy for frequently drying off your lens.
The ground may be very slick. Often there is just a tiny bit of rock or glacial silt on top of the ice. Be very cautious with your footing, especially on slopes.
These caves will be more stable and generally safer in winter, but getting there may be more challenging. Large amounts of snow on top may also block some sunlight, making them less glowy.
This Cave and the Photo
This cave, unfortunately, collapsed last summer. But there are many more tunnels and caves to explore in the area. They're located in the terminal moraine of the Canwell Glacier in the Eastern Alaska Range, about 2-6 miles of hiking, depending on your parking location (my hiking guide). The terrain is rough over large moving talus, but this area is not particularly dangerous if you're familiar with backcountry travel (and pay attention to your footing). Route finding is tricky, as you can quickly lose your bearings in the ups and downs over the rocky moraines.
One of the caves seen from the moraine above

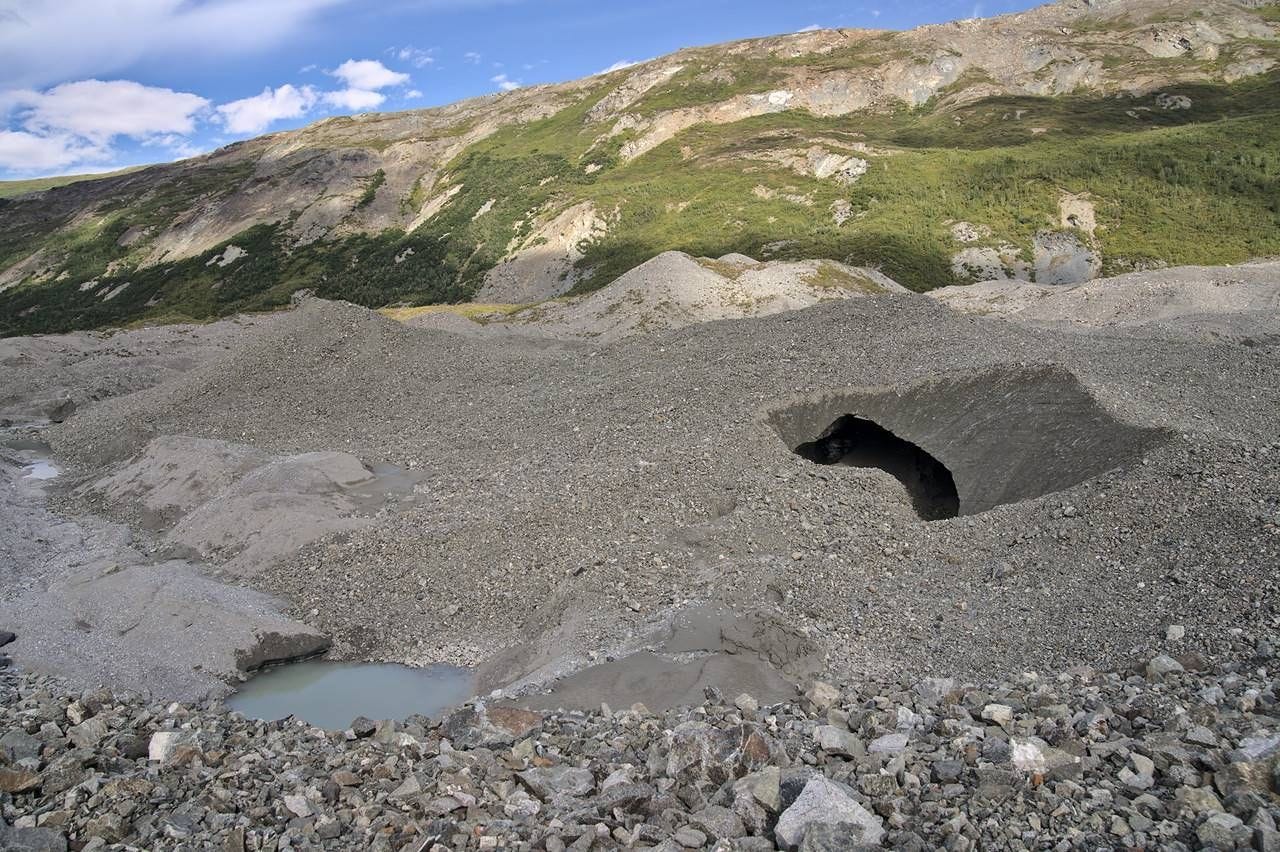
One of the 3 entrances to the cave from this post
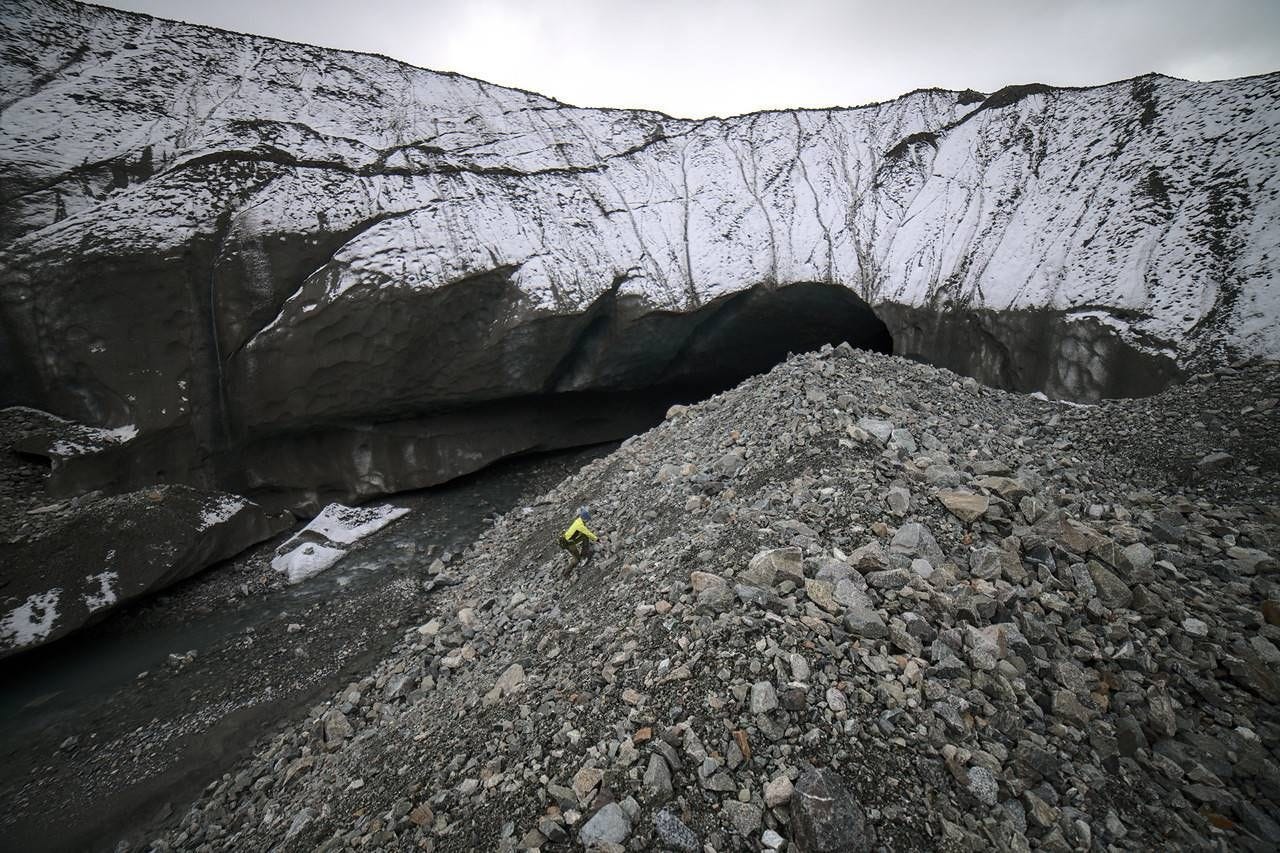
That's my wife for scale (taken the following week)
The "Blue Light" photo was taken on a tripod above eye level to give a perspective looking slightly down. Given the geometry of the cave, that gave the image a bit more depth than I had looking up. I recommend checking how different angles look in your shots; small changes can make significant differences in the final image. It was considerably brighter at the distant entrance, and I needed some masking during editing to avoid losing the highlights (I'll write detailed articles on that in the future). Alternatively, you could bracket exposures and merge for HDR (I'm not a fan of the tone-mapped look when doing this, but that's a personal choice).
You can find the photo settings beneath the original photo at the top of this post.
More Photos From The Canwell Glacier
About the About the Shot
This is a new series and my first paywall content on Post, Patreon, and Ko-Fi. I don't fully believe in paywalled content, as I want to share content freely (the paywall will be removed in one month). The information in these posts will eventually be released as free content in a more general article. Here I present as much information that someone would find helpful or interesting as I can about a single image. By paying for this, you get the info in a much more detailed form early. These will be available on Post for about a quarter a post or all for my $5/month or higher Substack, Patreon, or Ko-fi subscribers.